
I am lunch parent at my son's Montessori class a couple of Tuesdays each month. I get to hang out with Pie Pie in his Ergo and one of the teachers, and help open lunch containers and remind the children to talk a little less, and eat a little more.
The teacher and I began chatting about the wonderful craft projects the kids are creating to prepare for International Day. Tote bags displaying green stenciled Celtic knots and colorful German-like paper towel tube nutcrackers decorate the walls in the classroom. I mentioned that my daughter's pre-school doesn't do "real" crafting projects and how nice it is that Mini Mister gets to dig in and be crafty a little bit.
The teacher was telling me when she returned home from a stint in Germany years back that she didn't have much money, (having spent it all in Europe,) and that she kept her crafting fingers busy stitching projects found at home.
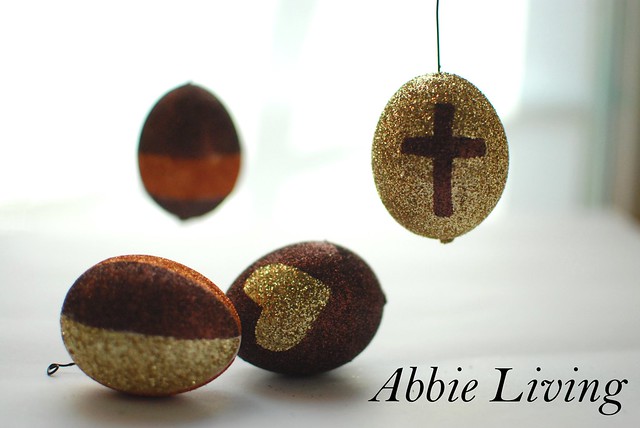
That got me thinking about what craft supplies I have saved up, stored up, and put away. That was when "glittered eggs" came to me. What a simple and easy decoration for the Easter season! (As I found out, it maybe a simple idea, but not necessarily one so easy to execute.)
So I blew out some eggs (and made an omelet for breakfast) pulled out my glitter and glue and got to work.
Materials:
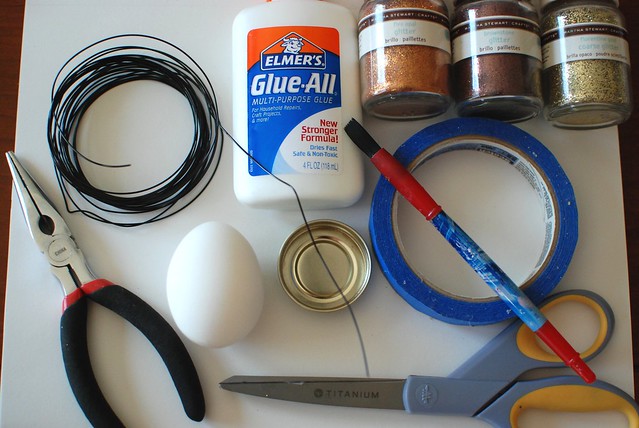
- Glitter (I used Martha Stewart Crafts Fine Glitter in Fire Opal, Brownstone, and course glitter in Florentine Gold.)
- Glue (use one that is a bit runny, like Elmers multi-purpose glue)
- Old paint brush (one with a flat brush, not a pointy one. And one that you don't care about too much, in case you forget to wash the glue out like I did.)
- Painters tape, or other low-tac tape
- Scissors
- X-acto knife (this is one of my favorite tools, though not shown here; and the blade need not be sharp)
- Eggs that have been blown out, rinsed, and dried (see below for pointers on how to do this)
- 6" lengths of 18 gauge black wire (though this could be any color you like)
- Wire cutters and needle nose pliers
- A piece of computer paper
- A Ziploc baggie, or bottle top as shown above
Stats:
- Blowing out eggs isn't as tricky as it sounds. Just have a tasty quiche recipe handy for leftovers.
- If you are buying glitter, it is a bit expensive but a little goes along way. Brownstone is currently $8.61 for 1.5 oz; Florentine Gold is $5.19 for 1.5oz; and the Fire Opal is $11.34 for 1.5oz, on the Martha Stewart website. Glitter sets can be more economical and give you an assortment of colors, though in smaller quantities.
How To:
1. Here is how I blew out my eggs: First make two small holes by poking the point of the X-acto knife gently into the top and into the bottom of the egg. With the tip of the knife blade make each hole round and large enough to fit a tooth pick. Don't twist the blade, this will crack the egg. Instead keep poking with the blade tip to enlarge the hole. Try to place the holes on the exact top and bottom and try to keep the holes smaller.
Then insert a toothpick into the bottom end hole and wiggle it around, pushed it in and out, and up and down to break up the egg inside. Then blow through the top end and let the egg slowly come out the bottom. Each time a little gets stuck, insert the toothpick again and "beat-up" the egg inside before continuing to blow.
To clean the egg, submerged it in a bowl full of vinegar water (1 part vinegar, 10 parts water) with one hole facing up and let the air bubbles come out. Don't totally fill it up with water. Then hold your fingers over both ends and shake the vinegar water around inside.Then blow into the top hole and blow out the vinegar water through the bottom hole. Repeat the rinsing process a few times and then set the empty clean egg aside to dry.
This YouTube video does a pretty good job of demonstrating what I wrote here. I don't use a drill, but you could if you have one. My knife did just fine and I didn't break a single egg.
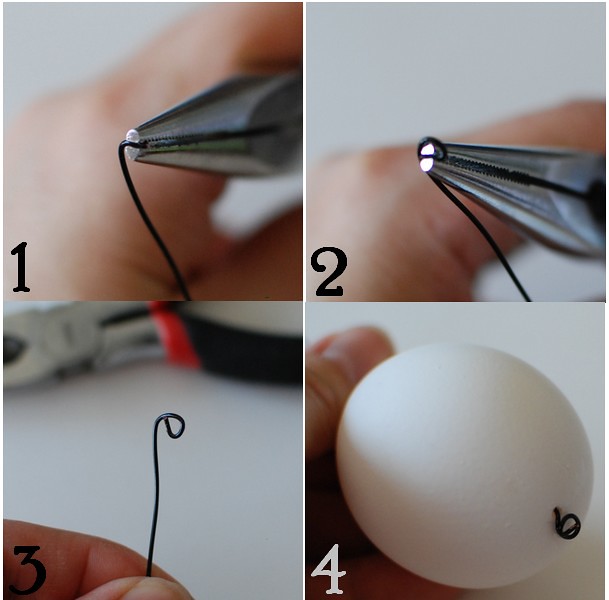
2. Cut a 6" length of wire with the wire cutters. Use the needle nose pliers to create a spiral in the wire as shown above. Insert the straight end into the egg, and again use the pliers to shape the straight end into a spiral. Glue the wire to the egg at the bottom end and set aside to dry.
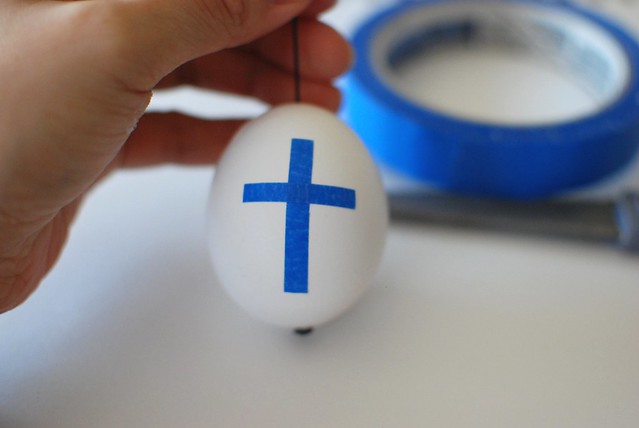 3. Cut strips of painters tape with the scissors and tape a cross onto the side of the egg. Press the edges of the tape to the egg to make sure they adhere. Or create what ever motif you wish with the painters tape and press edges to seal.
4. Place a piece of computer paper on your work surface. Holding the wire, with the paint brush cover the entire egg's surface with glue. (Even over the blue painters tape and try to ensure that the glue is even, thick and smooth, not bumpy.)
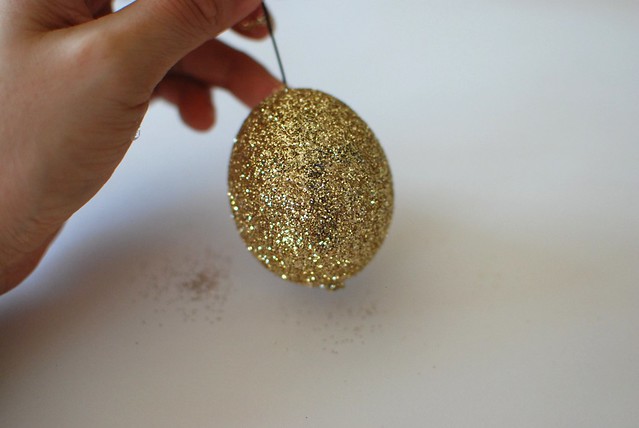 5. Pour glitter over the glued egg. Shake off excess glitter onto the computer paper. (Pour glitter at a right angle to the surface of the egg. Don't roll the egg in the glitter, don't pour some on the top and then tilt the egg so the glitter falls down to other glued parts of the egg. These two techniques don't provide the best glitter coverage. Don't worry about getting a ton of glitter on the paper below. The paper will catch it and you can return the glitter to its container.)
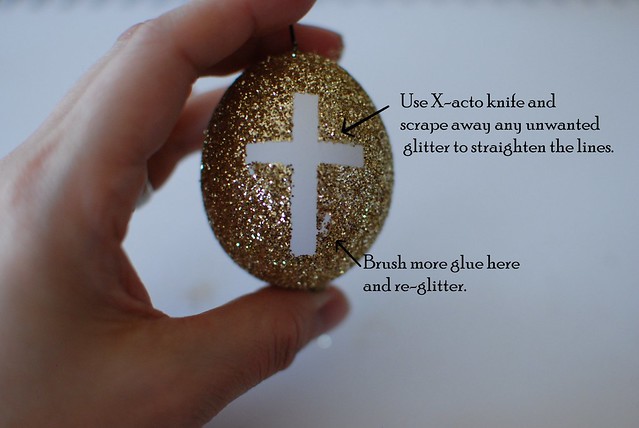 6. With the X-acto knife take off the painters tape while the glue is still tacky. You can touch up the edges of the cross as noted above. Set aside the egg so that the glue will dry. It is best to hang the egg by its hanging wire so that the glitter and glue will not get marred.
 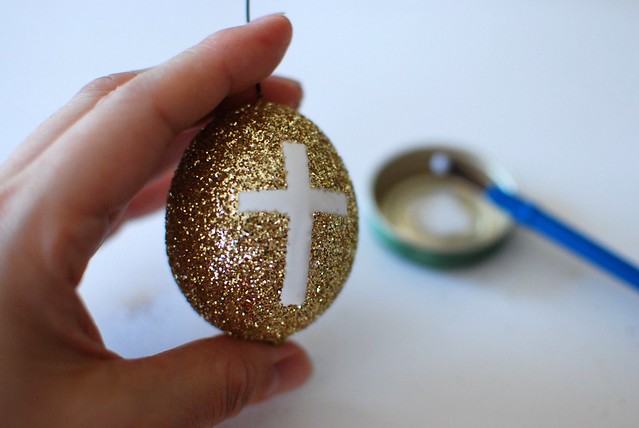 7. With a paint brush apply glue to the cross shape, making sure to cover all the corners. Apply a contrasting glitter in the same manner and gently bump the excess off onto the paper. Hang the egg so the glue will dry. And that's it! Try different color combinations and try different motifs to create a neat Easter collection.
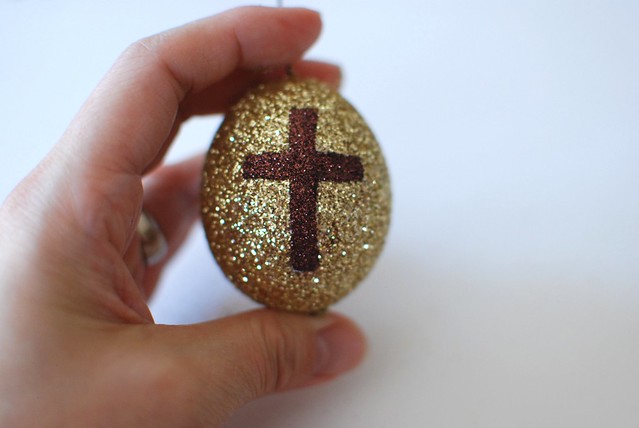

Outtakes:
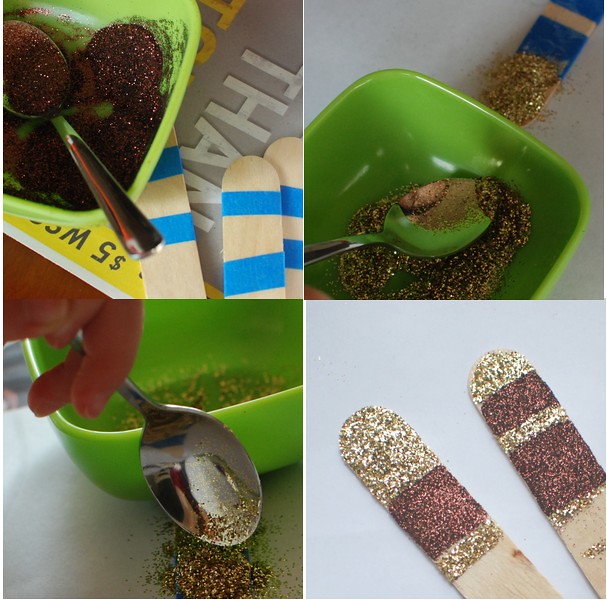
My daughter wanted to glitter something too, so I quickly put this little project together for her. Popsicle sticks with a little tape, glue, and glitter. Super quick and easy. And she got tired of it after just three sticks, leaving me to finish putting together this tutorial in relative peace.
Inspiration:
Here are a couple of the images that inspired me to create this craft tutorial.
Martha Stewart glittered eggs
"Jesus" Easter Eggs by Jeanne Winters
 Hello, I am glad you came. Abbie Living is the place where I share my sewing, knitting, and crafting projects and most importantly, share my passion for helping others in need.


0 comments:
Post a Comment